Using TensorFlow to create your own handwriting recognition engine

This post describes an easy way to use TensorFlowTM to make your own handwriting engine. It is shown here as an example project.

The full source code can be found on github https://github.com/niektemme/tensorflow-mnist-predict/.

Introduction

I am in the process of writing an article on Machine Learning. When writing on this topic it is hard to ignore TensorFlowTM, a deep learning engine open sourced by Google. Deep learning is a branch of Machine Learning that uses the concept of the human brain in the form of neural networks to solve various problems such as image and speech recognition (Image 1). Problems that are hard to solve using computer ‘traditionally’: using a computer as a big calculator.

Deep Neural Network

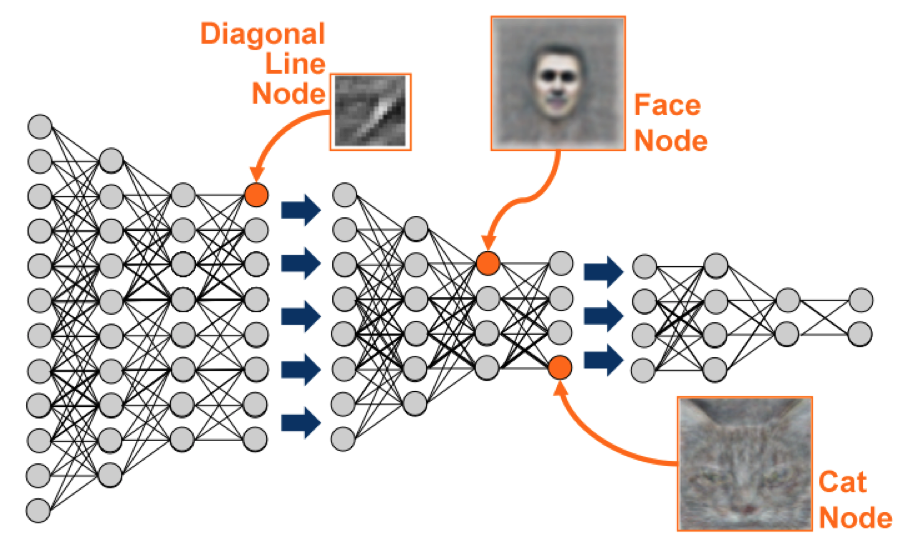
Image 1: Deep Neural Network (source: Google)

The fact that TensorFlow is created by Google gives it a lot of traction,especially among the tech sites I follow. To learn more about TensorFlow I joined the local “Coffee & Coding” meetup in Amsterdam who hosted “Get our hands dirty with TensorFlow”.

At the meetup we experimented with tutorials from the TensorFlow website. The tutorials themselves are clear and well written. To me it seems that these examples focus primarily on building and validating the model, but using the created models is not a priority. An exception to this is the ‘Image Recognition’ example. This is, however, one of the more complex examples, making it hard to use when you are not a Machine Learning expert.

While searching the internet–perhaps even using some AI from the same company that created TensorFlow–I saw that more people were trying to find how to apply the created models to solve actual problems.

So I set my goal on how to use a trained model using the easier TensorFlow MNIST tutorials on handwriting recognition.

Continue reading

Advertisement

Making your own smart ‘machine learning’ thermostat using Arduino, AWS, HBase, Spark, Raspberry PI and XBee

This blog post describes making your own smart thermostat using machine learning (K-means clustering) and a bunch of hardware: Arduino, Raspberry PI, two XBee’s and an Amazon Cloud sever (see: idea in brief). I have to start with a disclaimer. I am not a programmer good programmer and certainly not an electrical engineer. However, this research project yielded a working thermostat that is able to learn over time how to improve energy efficiency.

For those who want to directly go to the smart ‘learning’ part, you can skip to Part 7: Learning and adapting temperature scenarios in the Amazon cloud (SPARK). Otherwise, the structure of this post, after a short introduction and overview, follows the path of data, control and necessary feedback loops as shown in figure 1. Every part contains specific code examples. The full source code can found on github https://github.com/niektemme/.

  1. Introduction & overview
  2. Reading data form a ‘dumb’ thermostat and various temperature sensors (Arduino)
  3. Sending data, at 1,000 values per second, to a Raspberry PI (Python)
  4. Storing data in the Amazon Cloud (HBase)
  5. Turning the boiler on and off at the right time (Arduino)
  6. Using outside temperature and scenarios to control an Arduino from a Raspberry PI
  7. Learning and adapting temperature scenarios in the Amazon cloud (SPARK)
Idea in brief
This blog post describes building and programming your own smart thermostat. The smart part is based on machine learning in the form of K-means clustering to optimize when, how often and how long the boiler/furnace turns on. The thermostat is built on the concept of feedback loops (figure 1).

  1. The first feedback loop is an Arduino directly controlling the boiler (furnace).
  2. The second feedback loop is a Raspberry PI that uses XBee to wirelessly receive temperature data and boiler status information from the Arduino and send instructions back to the Arduino.
  3. The third and last feedback loop runs on a server in the Amazon cloud. This server uses the Spark Machine Learning Library (MLlib) and HBase to optimize the boiler control model that is running on the Raspberry PI.

schema_loop4
Figure 1: Overview

Continue reading