This blog post describes making your own smart thermostat using machine learning (K-means clustering) and a bunch of hardware: Arduino, Raspberry PI, two XBee’s and an Amazon Cloud sever (see: idea in brief). I have to start with a disclaimer. I am not a programmer good programmer and certainly not an electrical engineer. However, this research project yielded a working thermostat that is able to learn over time how to improve energy efficiency.
For those who want to directly go to the smart ‘learning’ part, you can skip to Part 7: Learning and adapting temperature scenarios in the Amazon cloud (SPARK). Otherwise, the structure of this post, after a short introduction and overview, follows the path of data, control and necessary feedback loops as shown in figure 1. Every part contains specific code examples. The full source code can found on github https://github.com/niektemme/.
- Introduction & overview
- Reading data form a ‘dumb’ thermostat and various temperature sensors (Arduino)
- Sending data, at 1,000 values per second, to a Raspberry PI (Python)
- Storing data in the Amazon Cloud (HBase)
- Turning the boiler on and off at the right time (Arduino)
- Using outside temperature and scenarios to control an Arduino from a Raspberry PI
- Learning and adapting temperature scenarios in the Amazon cloud (SPARK)
This blog post describes building and programming your own smart thermostat. The smart part is based on machine learning in the form of K-means clustering to optimize when, how often and how long the boiler/furnace turns on. The thermostat is built on the concept of feedback loops (figure 1).
- The first feedback loop is an Arduino directly controlling the boiler (furnace).
- The second feedback loop is a Raspberry PI that uses XBee to wirelessly receive temperature data and boiler status information from the Arduino and send instructions back to the Arduino.
- The third and last feedback loop runs on a server in the Amazon cloud. This server uses the Spark Machine Learning Library (MLlib) and HBase to optimize the boiler control model that is running on the Raspberry PI.

Figure 1: Overview
Acknowledgements
The code used in this project is often based on wonderful and clear written examples written by other people. In this blog post a specific example is referenced when it was used for a specific part of this project. However, before starting off with the introduction I would especially like to thank the following people (alphabetical order).
- Aravindu Sandela – bigdatahandler – http://bigdatahandler.com/
- Dave – Desert Home – http://www.desert-home.com/
- Lady Ada – Adafruit – http://www.adafruit.com/
- Lars George – HBase definitive guide – http://www.larsgeorge.com/
- Luckily Seraph Chutium – ABC Networks Blog – http://www.abcn.net/
- Michael Bouvy – http://michael.bouvy.net/
- Paco Nathan – O’Reilly Media – http://iber118.com/pxn/
- Robert Faludi – Digi International – http://www.faludi.com/
- Roger Binns – Another Python SQLite Wrapper – https://github.com/rogerbinns/apsw/
- Stephen Phillips – The University of Southampton, IT Innovation Centre – http://blog.scphillips.com/
1. Introduction & overview
1.1 introduction
This project is obviously related tot the Internet of Things (IOT). I got interested in IOT three years ago because IOT combines the Internet, consumer facing technology and data analysis. Seven years ago I made a career change from web development to Business Intelligence, something I have previously described in my other blog posts. IOT combines my previous experience with my current career, making it a sort of ‘best of both worlds’ industry for me. Apart from occasionally attending the Amsterdam IOT meetup, however, I had not done anything with it.
That changed when I went on vacation to California in summer 2014 to visit our friends and we had a great time. But while there, I also decided I could no longer hold it off and I should start experimenting with IOT myself. One of the reasons being that my friend already owned two Raspberry PI’s. To get up to speed I decided to buy two starter kits, the Arduino Experimentation Kit from Adafruit and the Building Wireless Sensor Networks (BWSN) from Sparkfun. I bought the Arduinio kit to learn the basics and the BWSN kit because I was interested in low powered mesh networks for in the home, like ZigBee. Robert Faludi wrote an excellent book on using the XBee developed by Digi International that explains this. The BWSN kit has the majority of the components to follow the experiments from the book. When I came back from vacation I also bought a Raspberry PI, to finally catch up with my friend.
Based on the amount of blog posts I found on creating you own thermostat it looks like a lot of people that begin to experiment with an Arduino or the Internet of Things start with building their own thermostat. A possible explanation is that it appears conceptually easy to understand. When it is too cold, turn on the furnace (see Furnace vs. Boiler below), when it is warm enough, turn it off. In practice it is more complicated, which you can see in responses from professionals on forums explaining that you should not try to do this yourself and there is a high risk of breaking your furnace.
The second change came when we bought our first house. We had been renting an apartment and making modifications, like putting in your own thermostat, was not possible. Our new apartment has an 11-year-old furnace, which needs to be replaced, so I had no reservations about using my own technology to turn it on and off, potentially breaking it.
My heating system at home is based on warm water radiators, the most common system in Europe. In this heating system I think the correct term for the appliance heating the water is ‘boiler’. In this blog post I use the term ‘boiler’, which is used in the UK, and furnace, the common term in the US, interchangeably.
In my project, I wanted to focus on collecting data and analyzing it to improve the thermostat and make it more energy efficient. To achieve this I thought of building a system with different feedback loops as explained in the general overview. When I started this project I had no knowledge or experience at all with any of the technologies used in the different parts. Because of this, this post is structured in the same way as I approached to project. First going up the route of data from the Arduino all the way to the HBase server in the Amazon cloud (part 2, 3, and 4). And then going up the same route again for controlling the furnace, first creating the closest feedback loop from the Arduino going up to automatic data analysis on the cloud server (part 5, 6 and 7).
Of course the only time I had to work on this project was in the evening and on weekends. So I started in January and just finished in June, when it was already too warm to turn on the heat anyway.
1.2 Overview
The idea of the smart thermostat I built is based on the idea of different feedback loops. This project uses three feedback loops (figure 2).
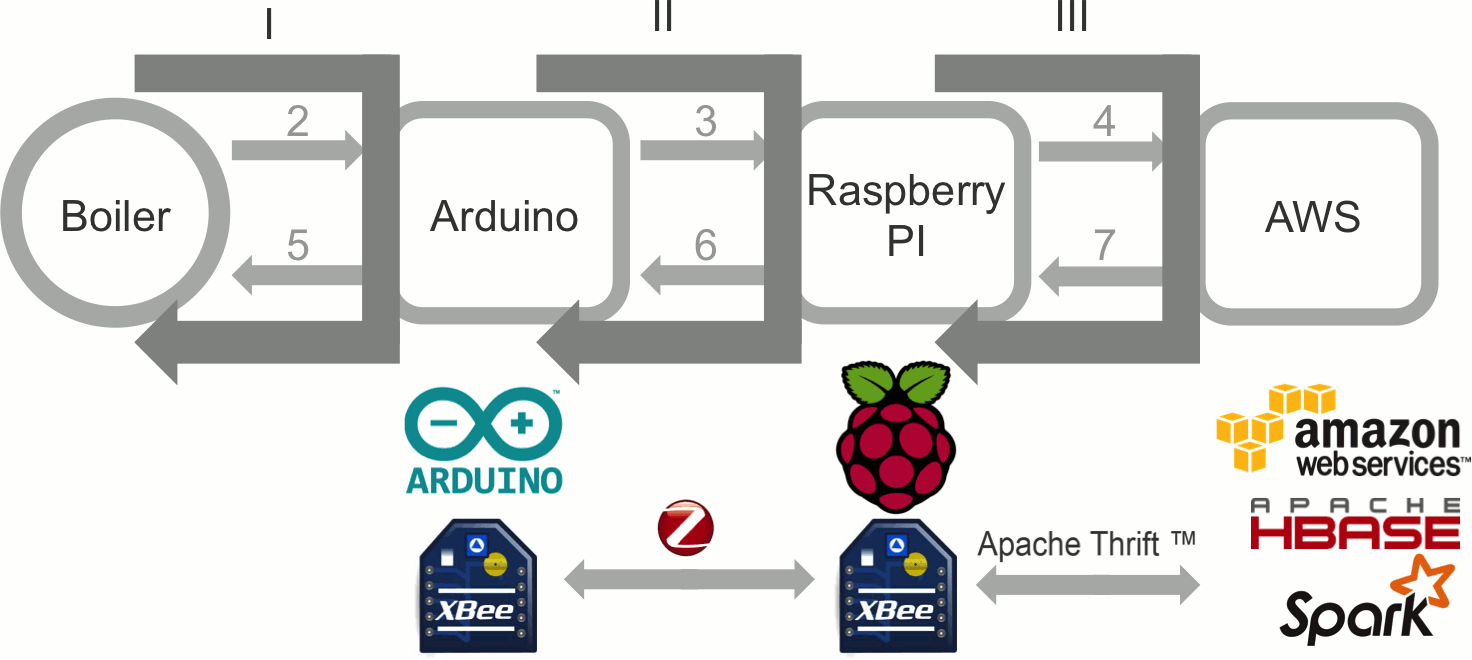
Figure 2: Feedback loops
- In the first feedback loop of my project an Arduino directly controls the boiler. By directly controling the boiler I mean that there is an analogue wire connected from the Arduino to the boiler and the Arduino is turning the boiler on and off, like a regular thermostat.
- The second feedback loop is a Raspberry PI that receives temperature data and boiler status information from the Arduino and sends instructions to the Arduino. A local low powerd wireless mesh network, in this case ZigBee, is used to connect the Arduino and Raspberry PI. The Raspberry PI can do more complex calculations and can also act as a central hub: gathering data from different wireless temperature sensors in the house and controlling the individual radiators in the different rooms. The Raspberry PI therfore uses a more complex model to determine whether the thermostat should be turned on or not. I programmed in Python for my project.
- The last feedback loop is a server in the Cloud. This server collects and stored all data for a longer period of time and has more processing power to analyze the collected information. This allows analyzing historic trends to by analysed and machine learning to optimize the model for turning on and of the furnace.
Next part:
2. Reading data form a ‘dumb’ thermostat and various temperature sensors (Arduino)

Reblogged this on Dinesh Ram Kali..
Pingback: Enabling technologies: how to build your own NEST | SmartDomus