This post describes an easy way to use TensorFlowTM to make your own handwriting engine. It is shown here as an example project.
The full source code can be found on github https://github.com/niektemme/tensorflow-mnist-predict/.
Introduction
I am in the process of writing an article on Machine Learning. When writing on this topic it is hard to ignore TensorFlowTM, a deep learning engine open sourced by Google. Deep learning is a branch of Machine Learning that uses the concept of the human brain in the form of neural networks to solve various problems such as image and speech recognition (Image 1). Problems that are hard to solve using computer ‘traditionally’: using a computer as a big calculator.
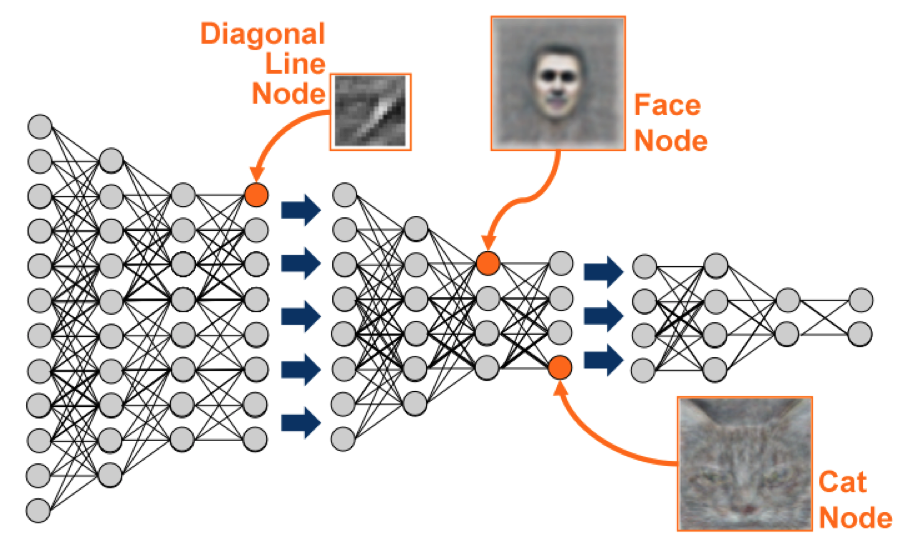
Image 1: Deep Neural Network (source: Google)
The fact that TensorFlow is created by Google gives it a lot of traction,especially among the tech sites I follow. To learn more about TensorFlow I joined the local “Coffee & Coding” meetup in Amsterdam who hosted “Get our hands dirty with TensorFlow”.
At the meetup we experimented with tutorials from the TensorFlow website. The tutorials themselves are clear and well written. To me it seems that these examples focus primarily on building and validating the model, but using the created models is not a priority. An exception to this is the ‘Image Recognition’ example. This is, however, one of the more complex examples, making it hard to use when you are not a Machine Learning expert.
While searching the internet–perhaps even using some AI from the same company that created TensorFlow–I saw that more people were trying to find how to apply the created models to solve actual problems.
So I set my goal on how to use a trained model using the easier TensorFlow MNIST tutorials on handwriting recognition.
Goals
The goal of this project is for my computer to recognize one of my own hand-written numbers using a trained model using the MNIST dataset. The MNIST dataset contains a large number of hand written digits and corresponding label (correct number).
This gives the following tasks:
- Train a model using the MNIST dataset.
- Save the model from step 1. Probably to file.
- Load the saved model in a different python script.
- Prepare and load an image of my own handwriting.
- Correctly predict the number I have written.
1. Train a model using the MNIST dataset
How to train a model is clearly explained in the first two tutorials form the tensorflow.org website. I did not modify anything in these the examples.
As expected, the model created form the second (expert) tutorial yielded better results in predicting the correct number form my handwriting.
2. Save the model
Saving the model is actually quite easy. It is clearly described in the TensorFlow documentation on saving and restoring variables.
It comes down to adding two lines of code to the python script explained in the TensorFlow tutorials.
Before initializing the TensorFlow (tf) variables you add:
This file contains hidden or bidirectional Unicode text that may be interpreted or compiled differently than what appears below. To review, open the file in an editor that reveals hidden Unicode characters.
Learn more about bidirectional Unicode characters
| saver = tf.train.Saver() |
and the following line at the bottom of the script:
This file contains hidden or bidirectional Unicode text that may be interpreted or compiled differently than what appears below. To review, open the file in an editor that reveals hidden Unicode characters.
Learn more about bidirectional Unicode characters
| save_path = saver.save(sess, “model.ckpt”) | |
| print (“Model saved in file: “, save_path) |
The documentation gives a good explanation on how to do this. I have created two python scripts that already include these lines to create a model.ckpt file.
– create_model_1.py uses the beginners MNIST toturial
– create_model_2.py uses the expert MNIST tutorial
3. Load the saved model in a different python script
Loading the model back into a different python script is also clearly explaind on the same page in the TensorFlow documentation.
First you have to initialize the same TensorFlow variables that you used to create the model file. Then you use the TensorFlow Saver function again to restore.
This file contains hidden or bidirectional Unicode text that may be interpreted or compiled differently than what appears below. To review, open the file in an editor that reveals hidden Unicode characters.
Learn more about bidirectional Unicode characters
| saver.restore(sess, "model.ckpt") |
4. Prepare and load an image of my own handwriting
The image of my written number has to be formatted in the same way as the images form the MNIST database. If the images don’t match, it will try to predict something else.
The MNIST website provides the following information:
– Images are normalized to fit in a 20×20 pixel box while preserving their aspect ratio.
– Images are centered in a 28×28 image.
– Pixels are organized row-wise. Pixel values are 0 to 255. 0 means background (white), 255 means foreground (black).
For the image manipulation I used the Python Imaging Library (PIL). Easily installed by:
This file contains hidden or bidirectional Unicode text that may be interpreted or compiled differently than what appears below. To review, open the file in an editor that reveals hidden Unicode characters.
Learn more about bidirectional Unicode characters
| sudo pip install Pillow |
Or look at the Pillow documentation for other installation options.
To get the image pixel values I perform the following steps. The code snippet of the imageprepare() function shows the code for all the steps.
- Load the image of my handwritten number.
- Convert the image to black and white (mode ‘L’)
- Determine which dimension of the original image is the largest
- Resize the image so that the largest dimension (ether the width of the height) is 20 pixels and the smallest dimension scales in the same ratio.
- Sharpen the image. This dramatically improves the result.
- Paste the image on a white 28×28 pixel white canvas. Center the image 4 pixels from the top or side from the largest dimension. The largest dimension is always 20 pixels and 4 + 20 + 4 = 28. De smallest dimension is positioned at half the difference between 28 and the new size of the scaled image.
- Get pixel values of the new image (canvas + centered image).
- Normalize the pixel values to a value between 0 and 1 (this is also done in the TensorFlow MNIST tutorials). Where 0 is white and 1 is pure black. The pixel values attained from step 7 are opposite where 255 is white and 0 black, so values have to be inversed. The following formula both inverts and normalizes (255-x)*1.0/255.0
I am cheating a bit, because I am suppling a cropped image. I have not adapted the function yet to auto crop. You can also use just a vector-based tool to create the handwritten image.
This file contains hidden or bidirectional Unicode text that may be interpreted or compiled differently than what appears below. To review, open the file in an editor that reveals hidden Unicode characters.
Learn more about bidirectional Unicode characters
| from PIL import Image, ImageFilter | |
| def imageprepare(argv): | |
| """ | |
| This function returns the pixel values. | |
| The imput is a png file location. | |
| """ | |
| im = Image.open(argv).convert('L') | |
| width = float(im.size[0]) | |
| height = float(im.size[1]) | |
| newImage = Image.new('L', (28, 28), (255)) #creates white canvas of 28×28 pixels | |
| if width > height: #check which dimension is bigger | |
| #Width is bigger. Width becomes 20 pixels. | |
| nheight = int(round((20.0/width*height),0)) #resize height according to ratio width | |
| if (nheigth == 0): #rare case but minimum is 1 pixel | |
| nheigth = 1 | |
| # resize and sharpen | |
| img = im.resize((20,nheight), Image.ANTIALIAS).filter(ImageFilter.SHARPEN) | |
| wtop = int(round(((28 – nheight)/2),0)) #caculate horizontal pozition | |
| newImage.paste(img, (4, wtop)) #paste resized image on white canvas | |
| else: | |
| #Height is bigger. Heigth becomes 20 pixels. | |
| nwidth = int(round((20.0/height*width),0)) #resize width according to ratio height | |
| if (nwidth == 0): #rare case but minimum is 1 pixel | |
| nwidth = 1 | |
| # resize and sharpen | |
| img = im.resize((nwidth,20), Image.ANTIALIAS).filter(ImageFilter.SHARPEN) | |
| wleft = int(round(((28 – nwidth)/2),0)) #caculate vertical pozition | |
| newImage.paste(img, (wleft, 4)) #paste resized image on white canvas | |
| #newImage.save("sample.png") | |
| tv = list(newImage.getdata()) #get pixel values | |
| #normalize pixels to 0 and 1. 0 is pure white, 1 is pure black. | |
| tva = [ (255-x)*1.0/255.0 for x in tv] | |
| return tva | |
| #print(tva) |
The argv variable passed to the imageprepare() function is the file path.
5. Predict the written number
Predicting the number is now relatively simple using the predict function. As explaind by ‘Pannus’ on the TensorFlow Github discussion on issue 97.
Following the documentation on restoring variables, the code for loading the model and using this model to predict the integer using the pixel values from preparing the image is one of the following:
When using the beginners MNIST tutorial (tutorial 1):
This file contains hidden or bidirectional Unicode text that may be interpreted or compiled differently than what appears below. To review, open the file in an editor that reveals hidden Unicode characters.
Learn more about bidirectional Unicode characters
| with tf.Session() as sess: | |
| sess.run(init_op) | |
| saver.restore(sess, "model.ckpt") | |
| #print ("Model restored.") | |
| prediction=tf.argmax(y,1) | |
| return prediction.eval(feed_dict={x: [imvalue]}, session=sess) |
When using the expert MNIST tutorial (tutorial 2):
This file contains hidden or bidirectional Unicode text that may be interpreted or compiled differently than what appears below. To review, open the file in an editor that reveals hidden Unicode characters.
Learn more about bidirectional Unicode characters
| with tf.Session() as sess: | |
| sess.run(init_op) | |
| saver.restore(sess, "model2.ckpt") | |
| #print ("Model restored.") | |
| prediction=tf.argmax(y_conv,1) | |
| return prediction.eval(feed_dict={x: [imvalue],keep_prob: 1.0}, session=sess) |
The difference between tutorial 1 and 2 is that the prediction in the model from the expert tutorial (model 2) uses the variable y_conv as the predicted label instead of y label in model 1 and that the prediction.eval function using model 2 requires another argument keep_prob: 1.0
The code snippet bellow shows the complete predictint() function to predict the correct integer and the main function to tie it all together (expert mode). The predictint() function takes the resulting pixel values from the imageprepare() function as input.
These complete scripts can also be used.
– predict_1.py uses the model form first MNIST toturial
– predict_2.py uses the model form the second MNIST expert toturial
This file contains hidden or bidirectional Unicode text that may be interpreted or compiled differently than what appears below. To review, open the file in an editor that reveals hidden Unicode characters.
Learn more about bidirectional Unicode characters
| import sys | |
| import tensorflow as tf | |
| def predictint(imvalue): | |
| """ | |
| This function returns the predicted integer. | |
| The imput is the pixel values from the imageprepare() function. | |
| """ | |
| # Define the model (same as when creating the model file) | |
| x = tf.placeholder(tf.float32, [None, 784]) | |
| W = tf.Variable(tf.zeros([784, 10])) | |
| b = tf.Variable(tf.zeros([10])) | |
| def weight_variable(shape): | |
| initial = tf.truncated_normal(shape, stddev=0.1) | |
| return tf.Variable(initial) | |
| def bias_variable(shape): | |
| initial = tf.constant(0.1, shape=shape) | |
| return tf.Variable(initial) | |
| def conv2d(x, W): | |
| return tf.nn.conv2d(x, W, strides=[1, 1, 1, 1], padding='SAME') | |
| def max_pool_2x2(x): | |
| return tf.nn.max_pool(x, ksize=[1, 2, 2, 1], strides=[1, 2, 2, 1], padding='SAME') | |
| W_conv1 = weight_variable([5, 5, 1, 32]) | |
| b_conv1 = bias_variable([32]) | |
| x_image = tf.reshape(x, [-1,28,28,1]) | |
| h_conv1 = tf.nn.relu(conv2d(x_image, W_conv1) + b_conv1) | |
| h_pool1 = max_pool_2x2(h_conv1) | |
| W_conv2 = weight_variable([5, 5, 32, 64]) | |
| b_conv2 = bias_variable([64]) | |
| h_conv2 = tf.nn.relu(conv2d(h_pool1, W_conv2) + b_conv2) | |
| h_pool2 = max_pool_2x2(h_conv2) | |
| W_fc1 = weight_variable([7 * 7 * 64, 1024]) | |
| b_fc1 = bias_variable([1024]) | |
| h_pool2_flat = tf.reshape(h_pool2, [-1, 7*7*64]) | |
| h_fc1 = tf.nn.relu(tf.matmul(h_pool2_flat, W_fc1) + b_fc1) | |
| keep_prob = tf.placeholder(tf.float32) | |
| h_fc1_drop = tf.nn.dropout(h_fc1, keep_prob) | |
| W_fc2 = weight_variable([1024, 10]) | |
| b_fc2 = bias_variable([10]) | |
| y_conv=tf.nn.softmax(tf.matmul(h_fc1_drop, W_fc2) + b_fc2) | |
| init_op = tf.initialize_all_variables() | |
| saver = tf.train.Saver() | |
| """ | |
| Load the model2.ckpt file | |
| file is stored in the same directory as this python script is started | |
| Use the model to predict the integer. Integer is returend as list. | |
| Based on the documentatoin at | |
| https://www.tensorflow.org/versions/master/how_tos/variables/index.html | |
| """ | |
| with tf.Session() as sess: | |
| sess.run(init_op) | |
| saver.restore(sess, "model2.ckpt") | |
| #print ("Model restored.") | |
| prediction=tf.argmax(y_conv,1) | |
| return prediction.eval(feed_dict={x: [imvalue],keep_prob: 1.0}, session=sess) | |
| def main(argv): | |
| """ | |
| Main function. | |
| """ | |
| imvalue = imageprepare(argv) | |
| predint = predictint(imvalue) | |
| print (predint[0]) #first value in list | |
| if __name__ == "__main__": | |
| main(sys.argv[1]) |
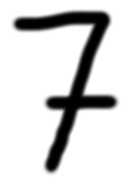
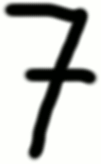
The result
Here are some of the numbers I tested using the neural network from the expert tutorial (model 2). The result is reasonably good. Funnily enough, it makes mistakes a human could make (except maybe mistaking a 7 for a 3). I guess some more fine-tuning is needed.
Correct
 correctly predicted as 1
 correctly predicted as 3
 correctly predicted as 4
 correctly predicted as 6
 correctly predicted as 7
Incorrect
 predicted as 0
 predicted as 2
 predicted as 3

Pingback: 使用TensorFlow创建自己的手写识别引擎 | 数盟社区
Pingback: Using TensorFlow to create your own handwriting recognition engine | Niek Temme - Charming Web Design
Hi, I have tried to re-implement a handwriting recognition engine based on your blog. I found the content of this article very helpful and I appreciate your effort of writing this blog. I’ve successfully execute the file “create_model_1.py”. However, when I am trying to execute “predict_1.py”, an error encountered. It tells that it can’t find the model file “model.ckpt”. And as I look up in the directory, there are files named “model.ckpt.index” and “model.ckpt.meta” respectively, but no one named “model.ckpt”. So I changed the restored file directory from “model.ckpt” to “model.ckpt.meta” in the function predictint() in predict_1.py and it works (a prediction is made).
However, the result is not as what you’ve described in this article. I’ve download all the image you said that your engine can predict correctly (1, 3, 4, 6, 7). My engine (which almost reuse your code except for the slightly change I’ve mentioned above) did not make a correct prediction except for the image 1.
I have to re-claim that I am not blaming you for building the engine incorrectly, I really do appreciate your effort for sharing this online. I am just wondering that is the change I’ve mentioned in paragraph one (from “model.ckpt” to “model.ckpt.meta” in the function predictint() in predict_1.py) resulted in the error my engine made? Should the restore model be exactly “model.ckpt” but not “model.ckpt.meta”? Or is there any reason you can think of that can result in the difference on the outcome of my engine and yours?
Thank you for reading the comment, and also thank you again for articulate all the implementation detail of this handwriting recognition engine. It really helps a lot especially for a almost newbie in Deep Learning like me. If you need any further information about the question I’ve encounter or anything else, please let me know. Thanks.
I also have the problem you mentioned above. Have you solved it?
replace saver.restore(sess, “model.ckpt”) with
new_saver = tf.train.import_meta_graph(‘model.ckpt.meta’)
new_saver.restore(sess, tf.train.latest_checkpoint(‘./’))
https://www.tensorflow.org/programmers_guide/meta_graph
I agree with DJ. Or you can use, import os (on top of the code), saver.restore(sess, os.path.abspath(“C:/Users/MyName/model2.ckpt”)) instead of saver.restore(sess, “model2.ckpt”). You need to clarify the location of the file.
Also, when i save 30×30 inches of sizes of png images to use for prediction, it guesses almost always correct.
This may help: http://stackoverflow.com/questions/41265035/tensorflow-why-there-are-3-files-after-saving-the-model
Hi, thank for your post very much.
I have tried and got an error when executing file “predict_1.py”.
It tells that
File “predict_1.py”, line 87, in
main(sys.argv[1])
IndexError: list index out of range
I hope someone helps me with that.
Thank you for reading my comment.
一样的错误,您解决了吗?
将main(sys.argv [ 1 ])前面加上空格。
Hello, doing computer vision as a hobby, I find this method incorrect.
“The MNIST website provides the following information:
– Images are normalized to fit in a 20×20 pixel box while preserving their aspect ratio.
– Images are centered in a 28×28 image.
– Pixels are organized row-wise. Pixel values are 0 to 255. 0 means background (white), 255 means foreground (black).”
Why would they do this?
You can scale images but you should train them on many different sizes by scaling.
When you use the ORB descriptor, it uses scaling to extract features. Why would you not do the same thing for recognition on the training data?
thank you so much It’s very helpful
Im getting the predictions correct for digits 1,2 3 and 7 only. 4 is predicted as 8 and rest as 5. Anyone can comment to make the predictions more accurate?